<?xml version="1.0" encoding="utf-8"?><feed xmlns="http://www.w3.org/2005/Atom" ><generator uri="https://jekyllrb.com/" version="3.9.5">Jekyll</generator><link href="https://colbylwilliams.github.io/feed.xml" rel="self" type="application/atom+xml" /><link href="https://colbylwilliams.github.io/" rel="alternate" type="text/html" /><updated>2024-07-16T21:45:36+00:00</updated><id>https://colbylwilliams.github.io/feed.xml</id><title type="html">Colby L Williams</title><subtitle>Thoughts on life and code.</subtitle><author><name>Colby Williams</name></author><entry><title type="html">Using Multiple Storyboards in Xcode IB and Xamarin</title><link href="https://colbylwilliams.github.io/2017/07/06/using-multiple-storyboards.html" rel="alternate" type="text/html" title="Using Multiple Storyboards in Xcode IB and Xamarin" /><published>2017-07-06T00:00:00+00:00</published><updated>2017-07-06T00:00:00+00:00</updated><id>https://colbylwilliams.github.io/2017/07/06/using-multiple-storyboards</id><content type="html" xml:base="https://colbylwilliams.github.io/2017/07/06/using-multiple-storyboards.html"><![CDATA[<p>I notice a lot of iOS developers who still stick to the “one storyboard per app” rule.  Or worse, they avoid using <code class="language-plaintext highlighter-rouge">.storyboards</code> all-together from fear of merge conflict hell (gross).</p>

<p><strong>Multiple <code class="language-plaintext highlighter-rouge">.storyboard</code> files in a single app <em>is</em> a thing, and I’d encourage iOS developers to utilize this pattern more often than not.</strong></p>

<p>I love Xamarin, but as I’ve <a href="/2016/09/26/default-designer.html">mentioned</a> before, I prefer to work with <code class="language-plaintext highlighter-rouge">.xibs</code> and <code class="language-plaintext highlighter-rouge">.storyboards</code> in Xcode Interface Builder opposed to Visual Studio’s built-in designer.</p>

<p>This video shows how you can use multiple <code class="language-plaintext highlighter-rouge">.storyboards</code> in your Xamarin.iOS (or just iOS) app, and create segues in Interface Builder directly to another <code class="language-plaintext highlighter-rouge">.storyboard</code> just like you would to a <code class="language-plaintext highlighter-rouge">UIViewController</code>.</p>

<video width="800" height="450" controls="">
	<source src="https://onedrive.live.com/download?cid=9BE09A799498DC42&amp;resid=9BE09A799498DC42%21462&amp;authkey=APpeuhMIJO5lqS8" type="video/mp4" />
	Your browser does not support the video tag.
</video>]]></content><author><name>Colby Williams</name></author><category term="xamarin" /><category term="xamarin-studio" /><category term="xcode" /><summary type="html"><![CDATA[This video shows how you can use multiple .storyboards in your Xamarin.iOS (or just iOS) app, and create segues in Interface Builder directly to another .storyboard just like you would to a UIViewController.]]></summary></entry><entry><title type="html">Intelligent Bot in a Native iOS and Android app</title><link href="https://colbylwilliams.github.io/2017/05/18/intelligent-bot-in-a-native-ios-and-android-app.html" rel="alternate" type="text/html" title="Intelligent Bot in a Native iOS and Android app" /><published>2017-05-18T00:00:00+00:00</published><updated>2017-05-18T00:00:00+00:00</updated><id>https://colbylwilliams.github.io/2017/05/18/intelligent-bot-in-a-native-ios-and-android-app</id><content type="html" xml:base="https://colbylwilliams.github.io/2017/05/18/intelligent-bot-in-a-native-ios-and-android-app.html"><![CDATA[<p>This is a quick tutorial where we’ll create and publish a new intelligent Bot that uses machine learning and natural language understanding to answer questions about Microsoft Bot Framework.  Then we’ll create a native iOS and Android app to interact with our bot.  Let’s get started!</p>

<p><br /></p>

<h3 id="setup-accounts--subscriptions">Setup: Accounts &amp; Subscriptions</h3>

<p>To get started, you’ll need to create/login to a few accounts.  (don’t worry, they’re all free)</p>

<p><strong>Microsoft Azure</strong></p>

<p>We’ll be using Azure Bot Service, so you’ll need an Azure account. If you don’t already have one, you can create a <strong>free</strong> Azure account <a href="https://azure.microsoft.com/free/">here</a>.</p>

<p><strong>Microsoft Bot Framework</strong></p>

<p><a href="https://dev.botframework.com/login?requestUrl=%2F">Create or login</a> to your <a href="https://dev.botframework.com/">Microsoft Bot Framework</a> account. Even if you already have an account, make sure to login, as it’ll simplify setting up your bot in Azure.</p>

<p><strong>QnA Maker</strong></p>

<p><a href="https://qnamaker.ai/Account/SignIn">Create or login</a> to your <a href="https://qnamaker.ai/">QnA Maker</a> account. Even if you already have an account, make sure to login, as it’ll simplify setting up your bot in Azure.</p>

<p><br /></p>

<h1 id="azure-bot-service">Azure Bot Service</h1>

<p>Next, we’ll use Azure Bot Service to build our bot.</p>

<h2 id="create-an-azure-bot-service">Create an Azure Bot Service</h2>

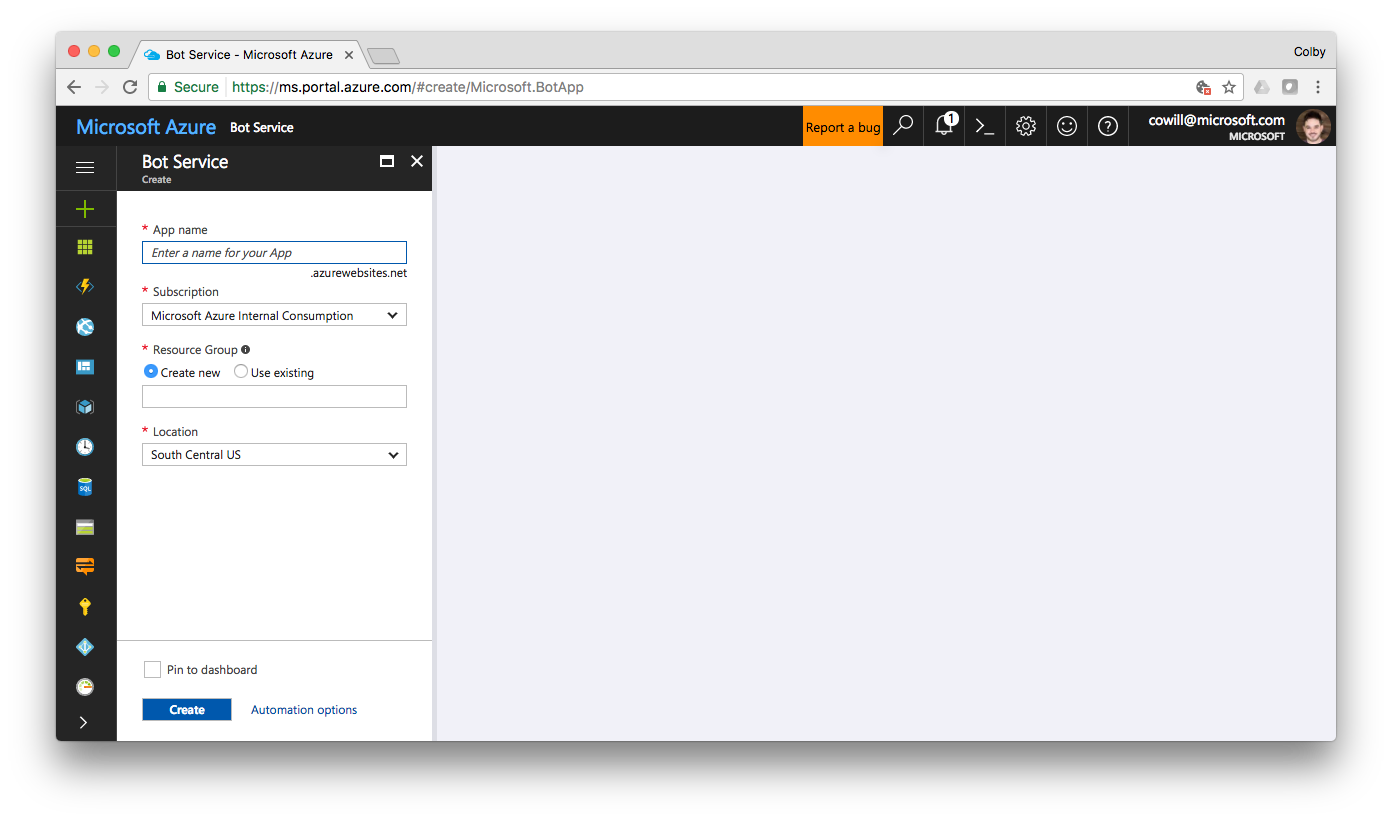
<p>Click <a href="https://ms.portal.azure.com/#create/Microsoft.BotApp">here</a> to create a new Azure Bot Service resource in the Azure portal</p>

<p><code class="language-plaintext highlighter-rouge">App name</code>: This will be your bot’s default name, and the first part of your bot’s url<br />
<code class="language-plaintext highlighter-rouge">Subscription</code>: Choose the subscription you want to use from the drop-down<br />
<code class="language-plaintext highlighter-rouge">Resource Group</code>: Leave “Create new” selected, and leave the value the same as <em>App name</em><br />
<code class="language-plaintext highlighter-rouge">Location</code>: Choose the location that best describes your current location<br />
<img src="/images/qa-bot-sample-27.png" alt="screenshot" /><br />
Click <strong>Create</strong> to create and deploy your new Azure Bot Service.</p>

<h2 id="configure-your-bot">Configure your bot</h2>

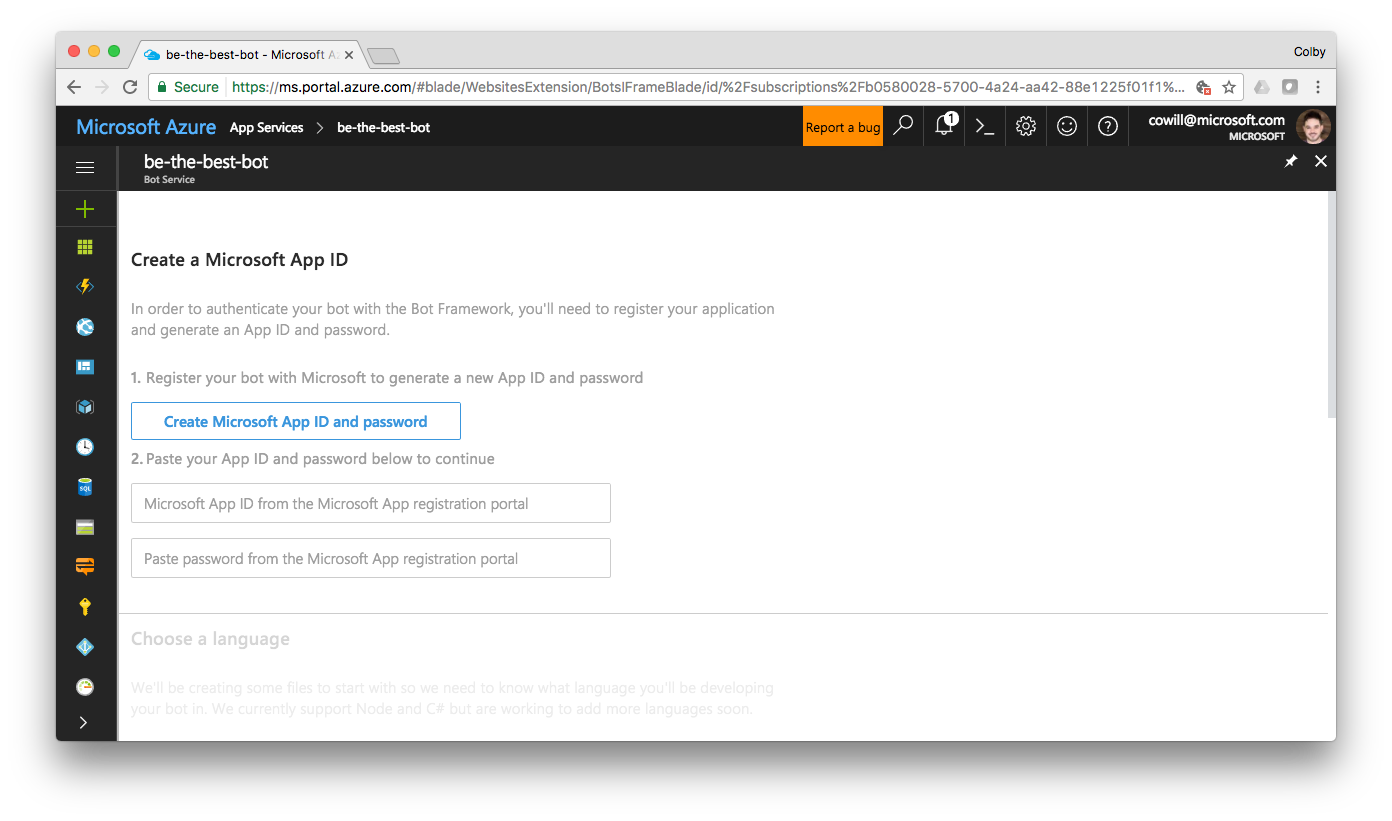
<p>Once your bot is finished deploying, open it in the Azure portal.  You can click <a href="https://portal.azure.com/#blade/HubsExtension/Resources/resourceType/Microsoft.Web%2Fsites">here</a> to see a list of your resources where you’ll find your new Azure Bot Service.<br />
<img src="/images/qa-bot-sample-01.png" alt="screenshot" /><br />
Click <strong>Create Microsoft App ID and password</strong><br />
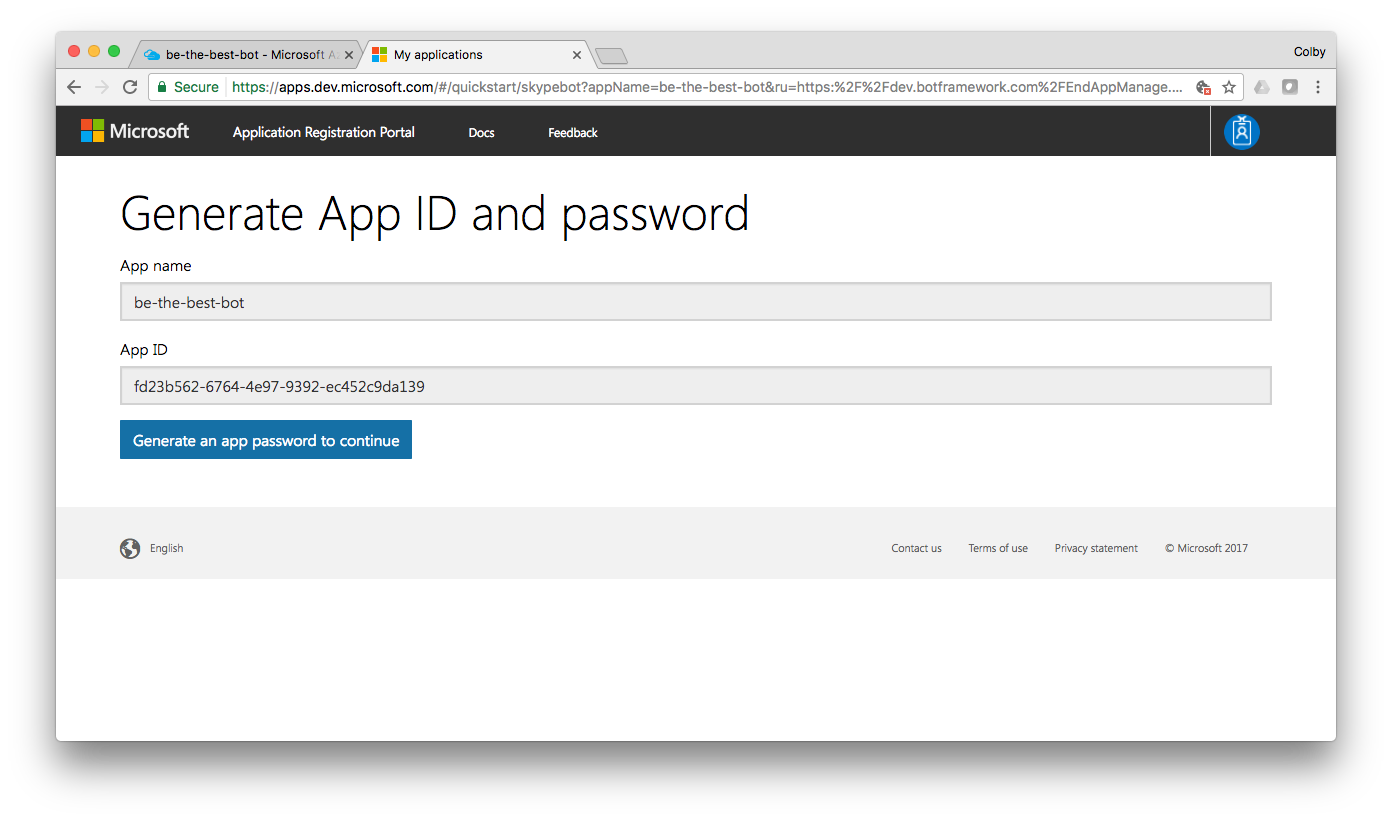
<img src="/images/qa-bot-sample-02.png" alt="screenshot" /></p>
<h5 id="this-should-open-a-new-tab-displaying-your-new-app-name-and-app-id-if-youre-prompted-to-login-make-sure-you-login-with-the-same-email-address-you-used-to-create-your-microsoft-bot-framework-account"><em>This should open a new tab displaying your new App name and App ID. (If you’re prompted to login, make sure you login with the same email address you used to create your Microsoft Bot Framework account).</em></h5>

<p>Next, click <strong>Generate App ID and password</strong> to show a pop-up displaying your new password.  Copy the password to your clipboard and click <strong>Ok</strong>.</p>

<p><em><strong>Make sure to store the password somewhere safe now as you will not be able to see it again.</strong></em></p>

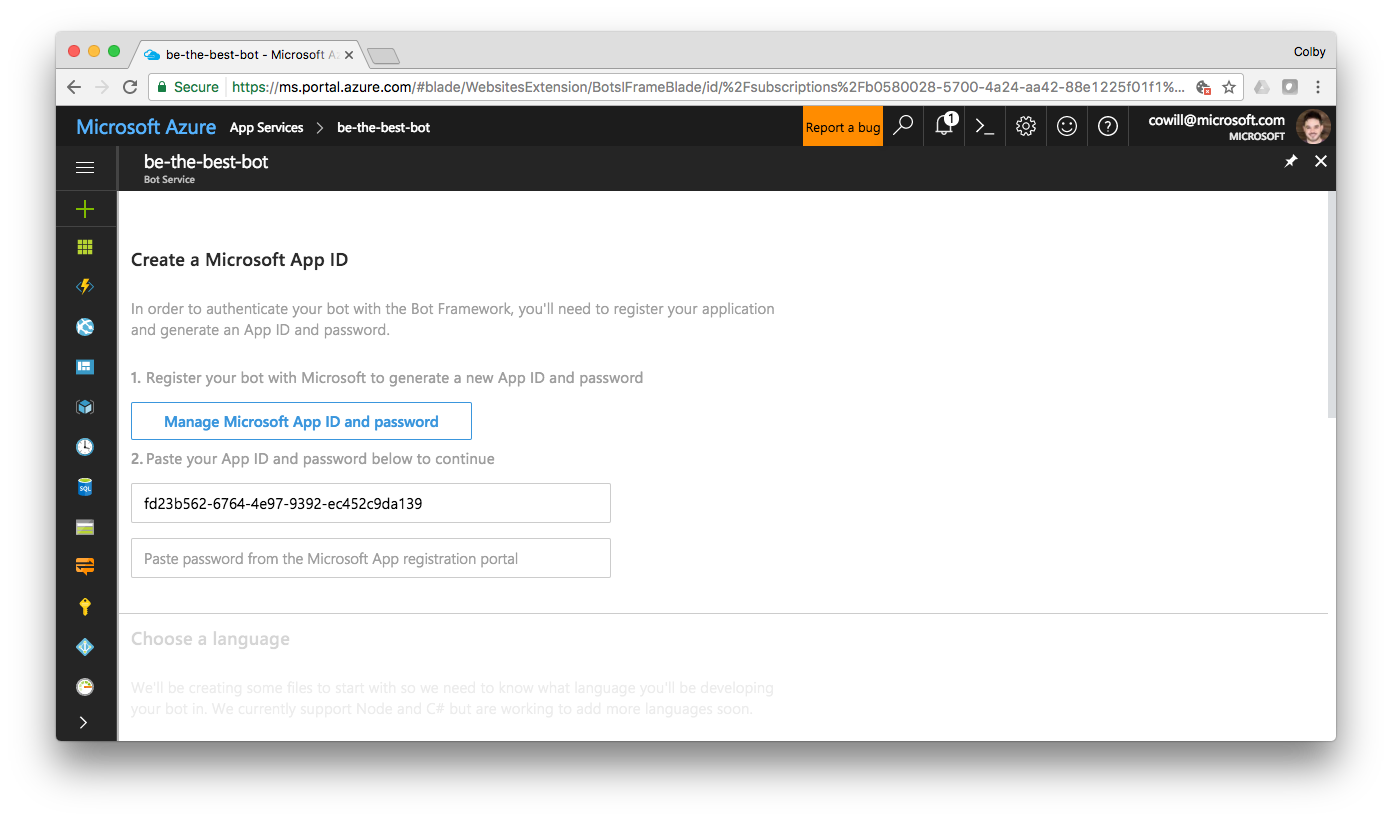
<p>Click <strong>Finish and go back to Bot Framework</strong>. This should close the tab and return you to the Azure portal with new App ID already be filled in.<br />
<img src="/images/qa-bot-sample-03.png" alt="screenshot" /><br />
<strong>Paste</strong> your new App password into the password field. Then, under <strong>Choose a language</strong>, select the language to write your bot in.</p>
<h5 id="note-ill-be-using-c-but-you-should-be-able-to-complete-this-sample-using-nodejs-as-well"><em>Note: I’ll be using C#, but you should be able to complete this sample using NodeJS as well.</em></h5>

<p>Choose the <strong>Question and Answer</strong> template under <strong>Choose a template</strong>, agree to the <em>Terms of Use, Privacy Statement, and Code of Conduct for the Microsoft Bot Framework (Preview)</em>, and click <strong>Create bot</strong>.</p>
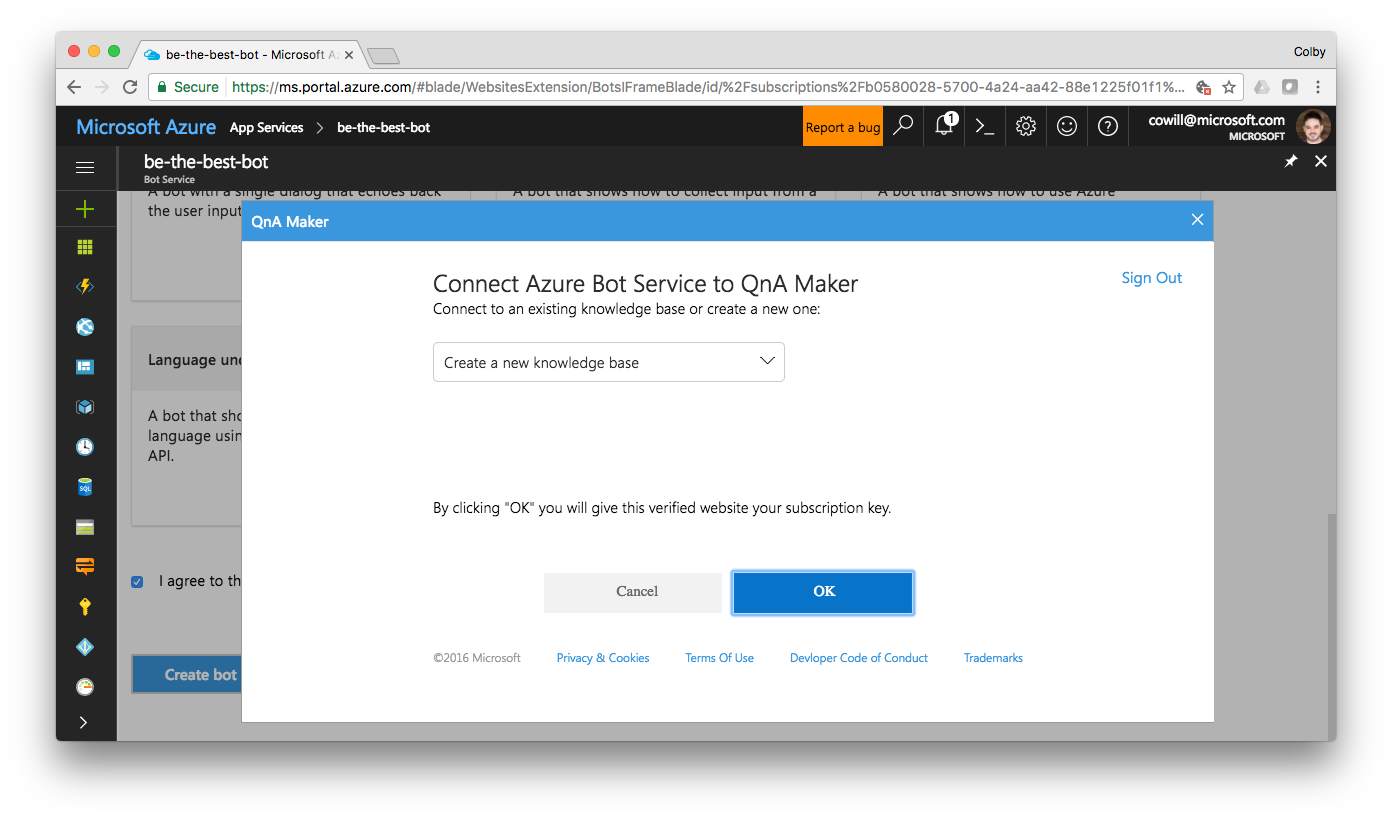
<h5 id="you-should-be-presented-with-a-pop-up-dialog-to-connect-azure-bot-service-to-qna-maker--if-not-make-sure-youre-logged-in-to-your-qna-maker-account-and-youre-not-blocking-the-associated-cookies"><em>You should be presented with a pop-up dialog to <strong>Connect Azure Bot Service to QnA Maker</strong>.  If not, make sure you’re logged in to your QnA Maker account, and you’re not blocking the associated cookies</em></h5>
<p><img src="/images/qa-bot-sample-07.png" alt="screenshot" /><br />
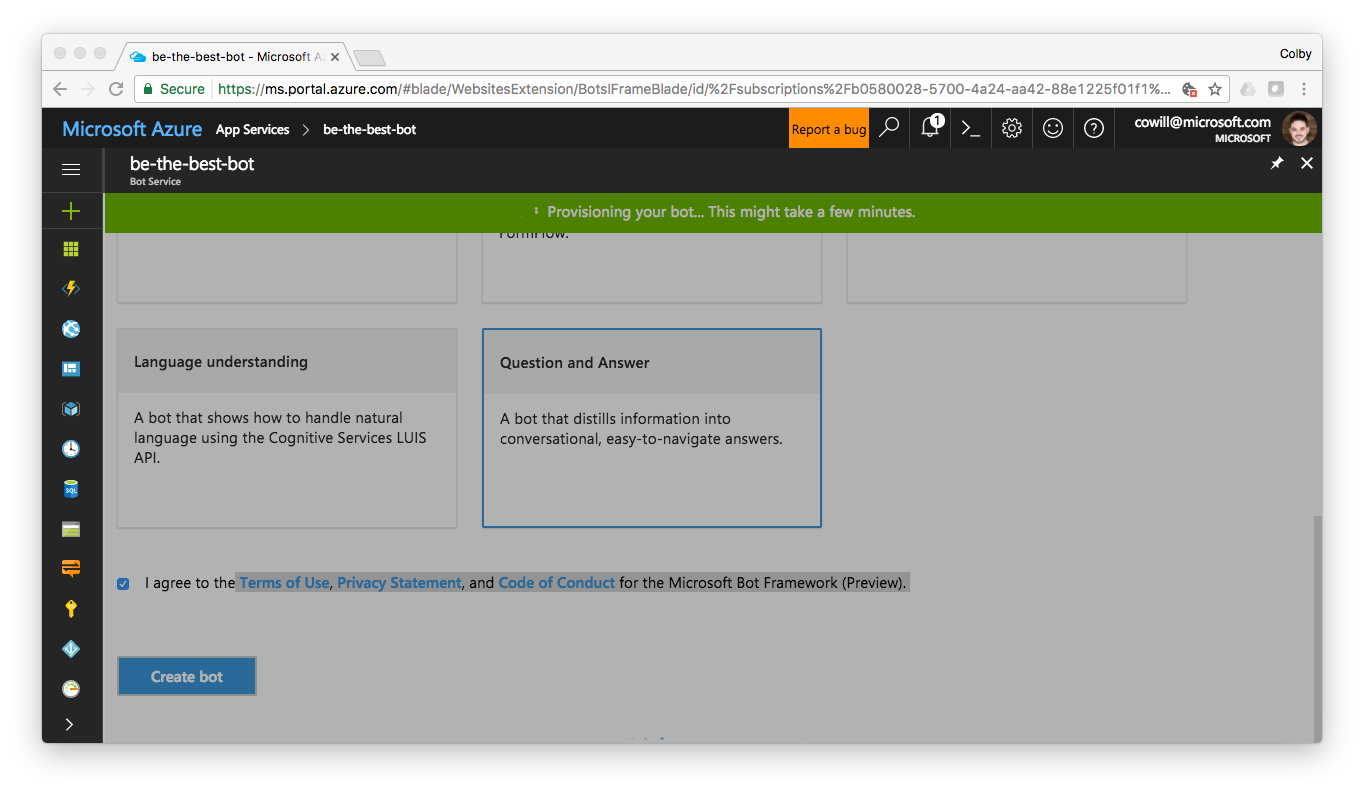
Leave (or select) <strong>Create new knowledge base</strong> selected in the drop-down menu and Click <strong>OK</strong>.  You should see a green banner across the top of the Azure portal letting your know your bot is being provisioned.<br />
<img src="/images/qa-bot-sample-08.png" alt="screenshot" /></p>

<h2 id="train-your-qna-service">Train your QnA service</h2>

<p>Now that your bot is set up and pointing to a new QnA service, we’ll need to teach the QnA service some, well… questions and answers.</p>

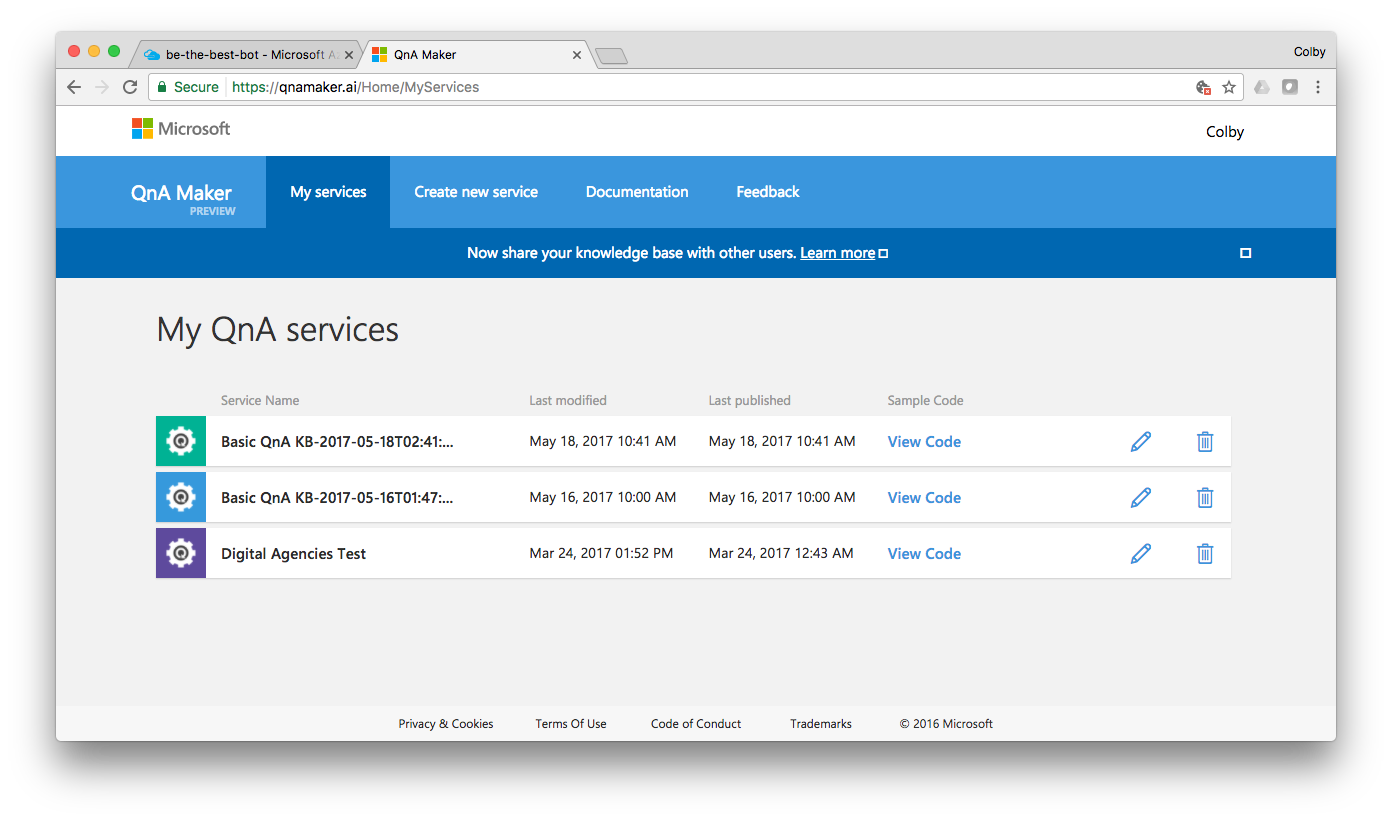
<p>Click <a href="https://qnamaker.ai/Home/MyServices">here</a> to view a list of your QnA services, and select edit icon next to the service you just created. It’ll likely be name something like <em>“Basic QnA KB-2017-05…“</em>.<br />
<img src="/images/qa-bot-sample-10.png" alt="screenshot" /><br />
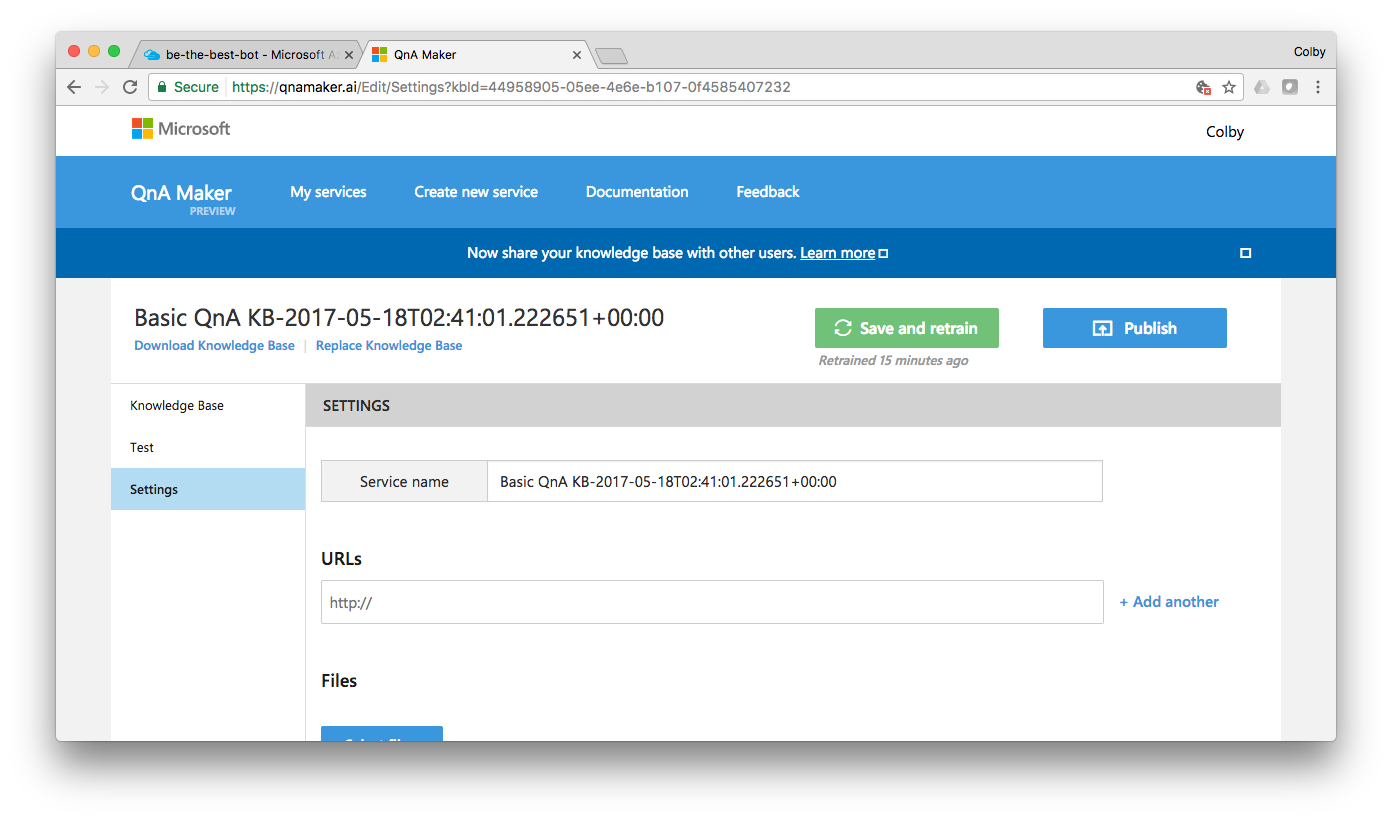
On the left hand side of the dashboard, select <strong>Settings</strong><br />
<img src="/images/qa-bot-sample-12.png" alt="screenshot" /><br />
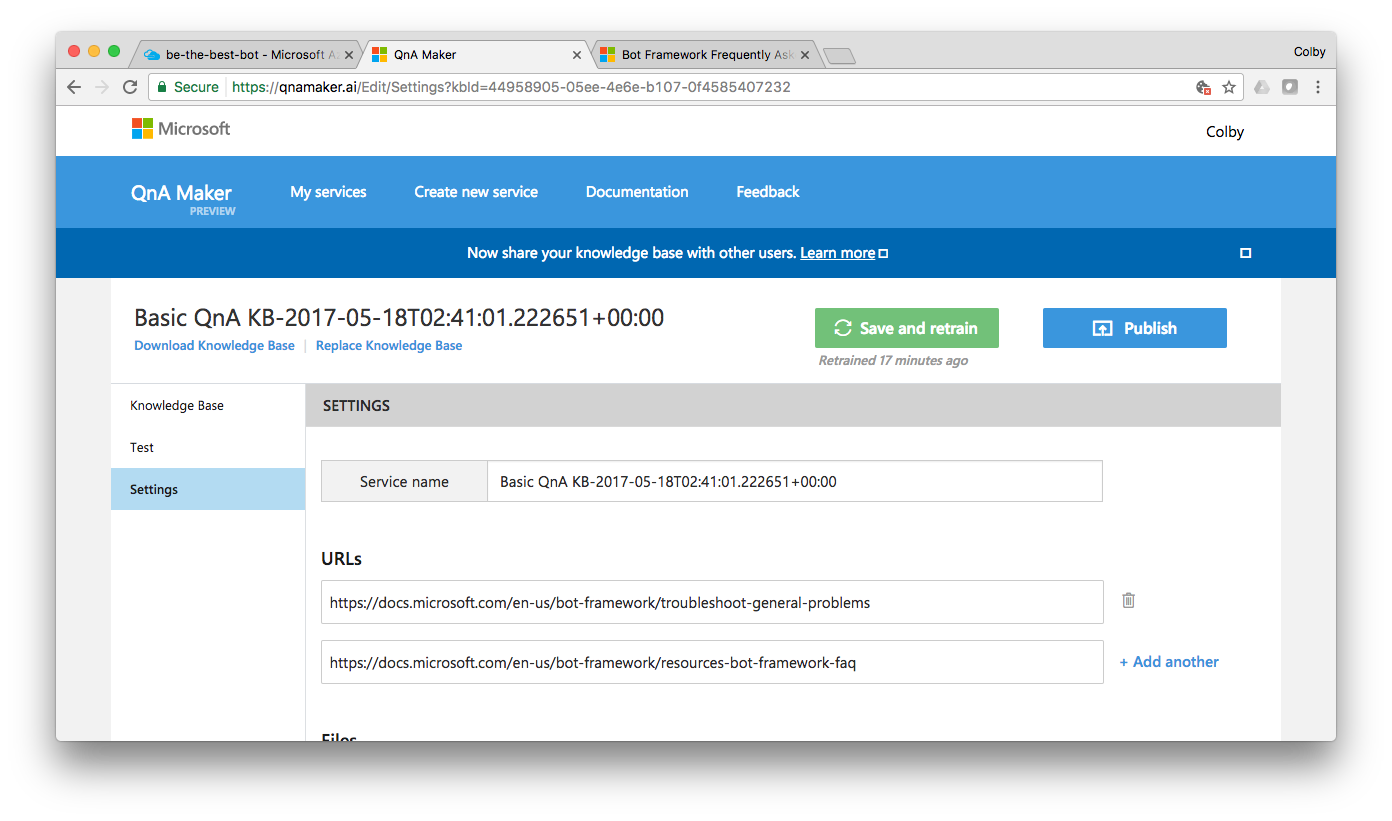
Paste the following urls into the <strong>URLs</strong> section. (<em>Note: you’re free to use any FAQ urls you want, it won’t prevent you from completing this sample)</em></p>
<ul>
  <li>https://docs.microsoft.com/en-us/bot-framework/resources-bot-framework-faq</li>
  <li>https://docs.microsoft.com/en-us/bot-framework/troubleshoot-general-problems</li>
</ul>

<p><img src="/images/qa-bot-sample-14.png" alt="screenshot" /><br />
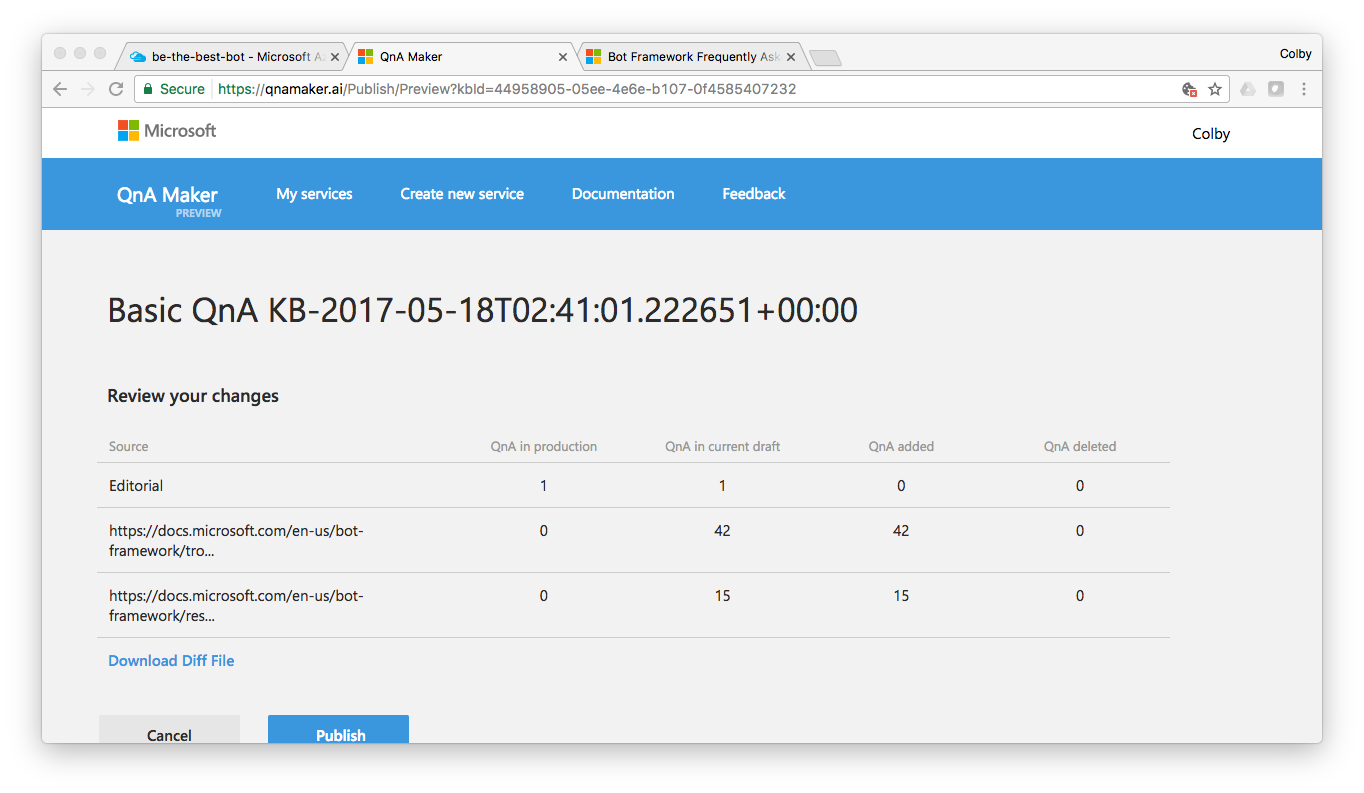
Click <strong>Save and retrain</strong>, then click <strong>Publish</strong>. You’ll be presented with a screen showing the changes to your services knowledge base that will be published.<br />
<img src="/images/qa-bot-sample-16.png" alt="screenshot" /><br />
Click <strong>Publish</strong>.</p>

<h2 id="test-your-bot">Test your bot</h2>

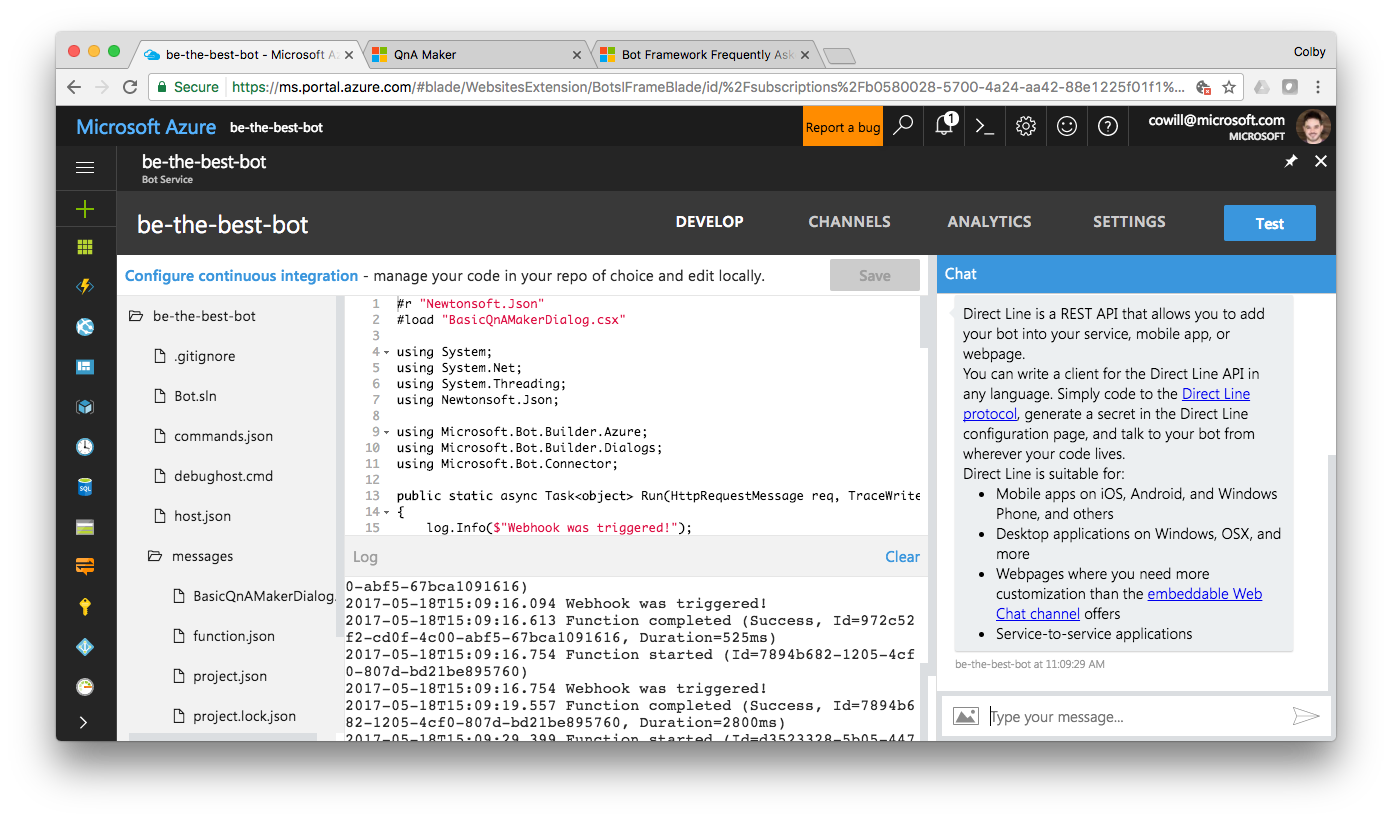
<p>Return to your Azure Bot Service in the Azure portal and click <strong>Test</strong> in the top right to open a web chat with your bot.</p>
<ul>
  <li>Type <code class="language-plaintext highlighter-rouge">Hi</code> in the chat window and press return</li>
  <li>Type <code class="language-plaintext highlighter-rouge">What's the Direct Line channel?</code> and press return</li>
</ul>

<p><img src="/images/qa-bot-sample-18.png" alt="screenshot" /></p>

<p><br /></p>

<h1 id="create-a-native-mobile-app">Create a Native Mobile App</h1>

<p><em>To complete this step you’ll need to have Visual Studio for Mac.  You can download and install it <a href="https://www.visualstudio.com/vs/visual-studio-mac/">here</a>.</em></p>

<p>Now we’ll create a native iOS and Android app to interact with our bot. I’ve created a custom Project Template for Visual Studio that sets everything up automatically. We’ll set that up first.</p>

<h2 id="install-nomadcodeprojecttemplates-extension">Install NomadCode.ProjectTemplates extension</h2>

<p>Here’s how to install NomadCode.ProjectTemplates:</p>

<ol>
  <li>Download the <code class="language-plaintext highlighter-rouge">.mpack</code> file under the Downloads section of the <a href="https://github.com/colbylwilliams/NomadCode.ProjectTemplates/releases/latest">latest release of NomadCode.ProjectTemplates</a></li>
  <li>Launch Visual Studio for Mac, open the <em><strong>Visual Studio</strong></em> menu and select <em><strong>Extensions…</strong></em></li>
  <li>In the bottom left of the <em>Extension Manager</em> dialog, click <strong>Install from file…</strong></li>
  <li>Choose the <code class="language-plaintext highlighter-rouge">.mpack</code> file you downloaded in step 1</li>
  <li>When prompted, select <strong>Install</strong></li>
  <li>Once installation is complete, click “Ok” and close the <em>Extension Manager</em> dialog</li>
</ol>

<h2 id="create-new-app">Create new App</h2>

<p>Now we’ll create our mobile app solution.</p>

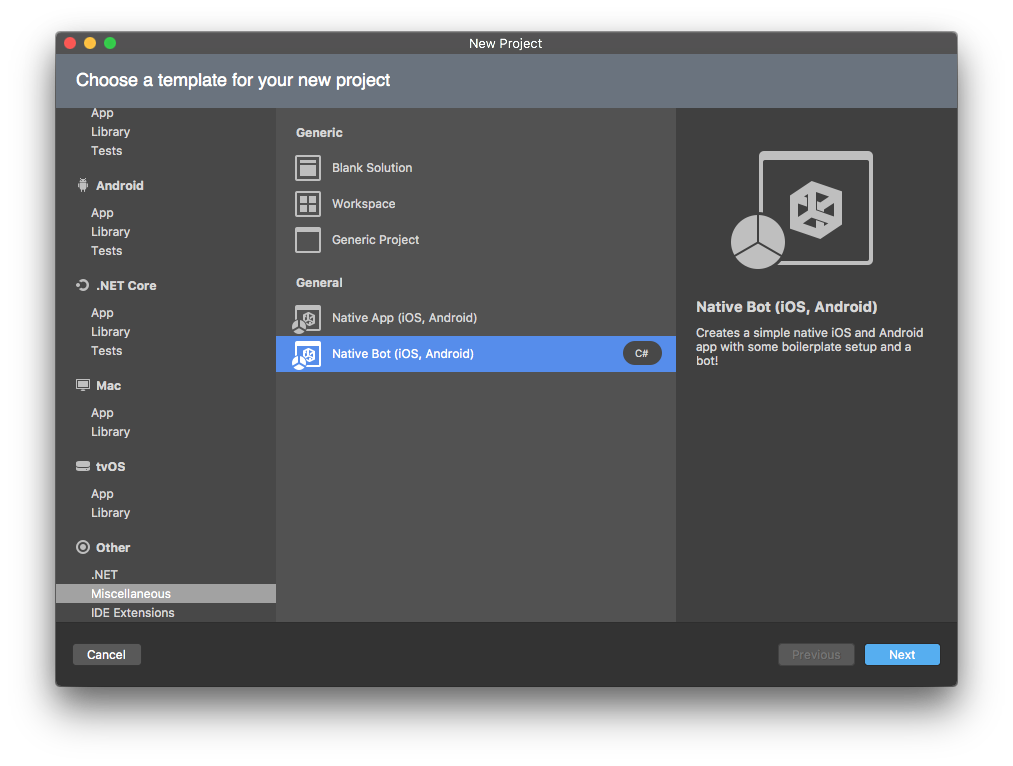
<p>In Visual Sudio for Mac, got to <em><strong>File</strong></em> -&gt; <em><strong>New Solution…</strong></em> (or Shift + ⌘ + N).  Then, in the <em>New Solution</em> dialog’s left column, select <strong>App</strong> (under Multiplatform) then <strong>Native Bot (iOS, Android)</strong> and click <strong>Next</strong>.
<img src="/images/qa-bot-sample-19.png" alt="screenshot" /></p>
<h5 id="note-depending-on-the-version-of-visual-studio-for-mac-this-project-type-may-be-under-other---miscellaneous---general-instead">Note: Depending on the version of Visual Studio for Mac, this project type may be under <em>Other -&gt; Miscellaneous -&gt; General</em> instead</h5>
<p><img src="/images/qa-bot-sample-20.png" alt="screenshot" /><br />
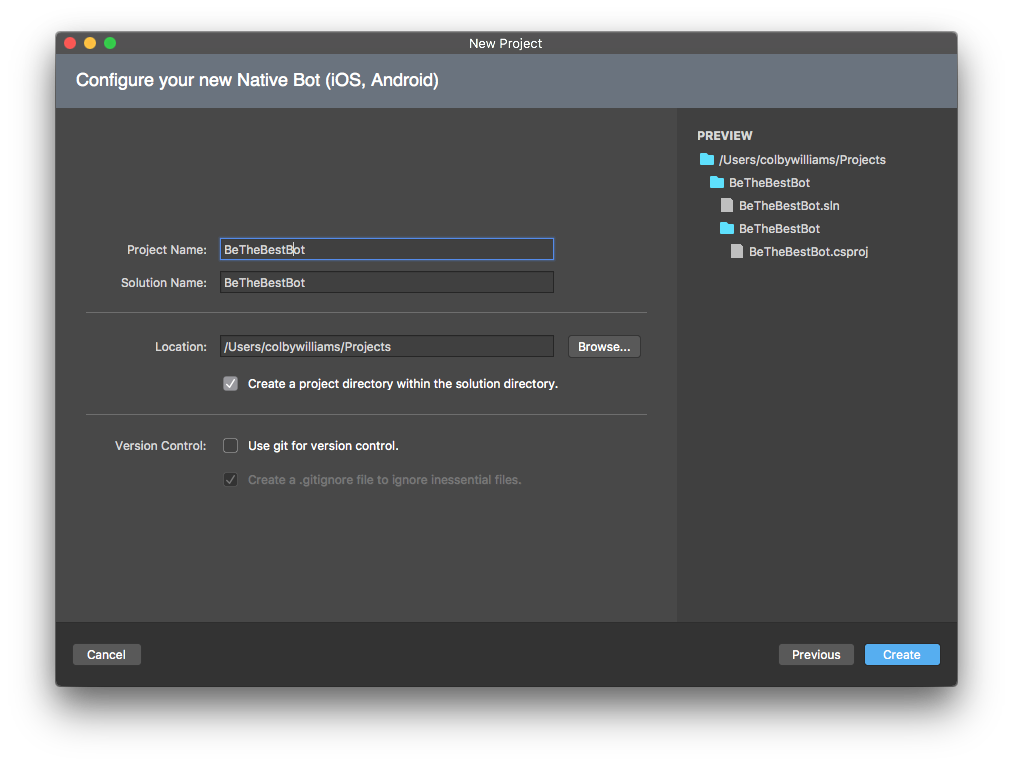
Finally name your project, choose a location, and click <strong>Create</strong>.</p>

<h2 id="enable-direct-line-channel">Enable Direct Line channel</h2>

<p>Your app will communicate with your bot via the Direct Line channel, so we’ll need to enable that back in the Azure portal.</p>

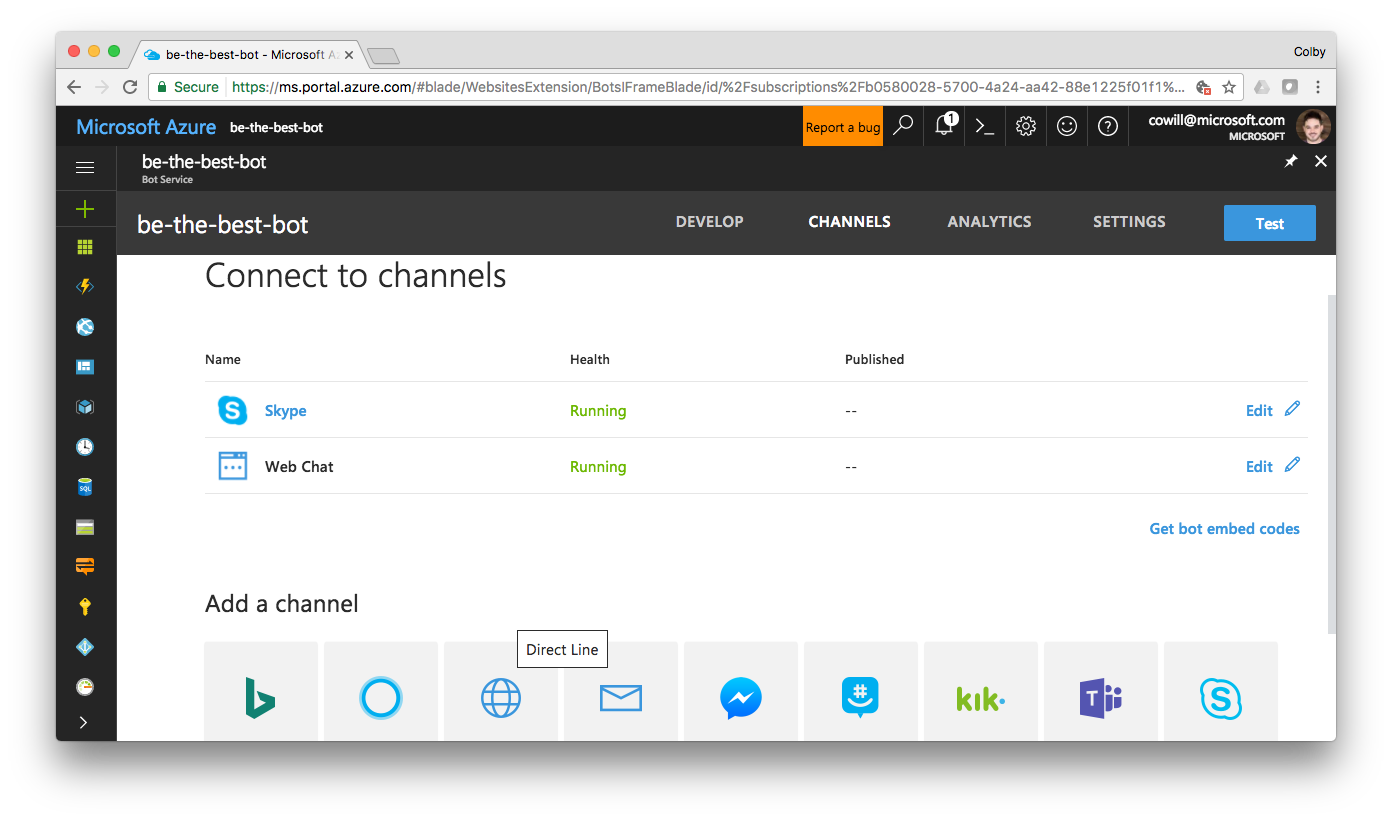
<p>Return to your Azure Bot Service in the Azure portal, and click <strong>CHANNELS</strong> in the top right to configure the channels your bot supports.
<img src="/images/qa-bot-sample-21.png" alt="screenshot" />
Under the <strong>Add a channel</strong> section, select the <strong>Direct Line</strong> channel.</p>
<h5 id="this-should-open-a-new-tab-to-configure-direct-line-if-it-does-not-make-sure-youre-logged-in-to-your-microsoft-bot-framework-account-and-youre-not-blocking-the-associated-cookies">This should open a new tab to <em>Configure Direct Line</em>. If it does not, make sure you’re logged in to your Microsoft Bot Framework account, and you’re not blocking the associated cookies.</h5>
<p><img src="/images/qa-bot-sample-23.png" alt="screenshot" />
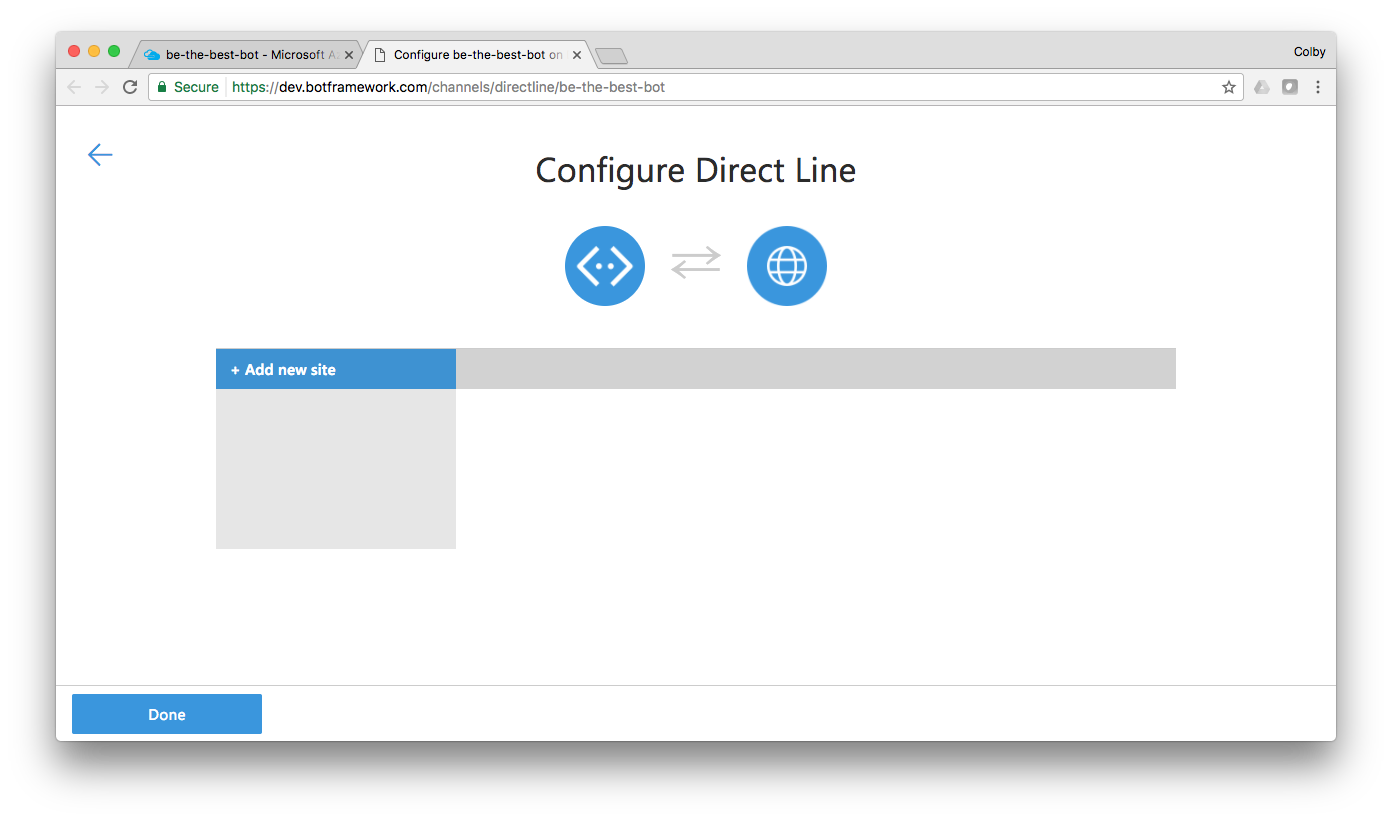
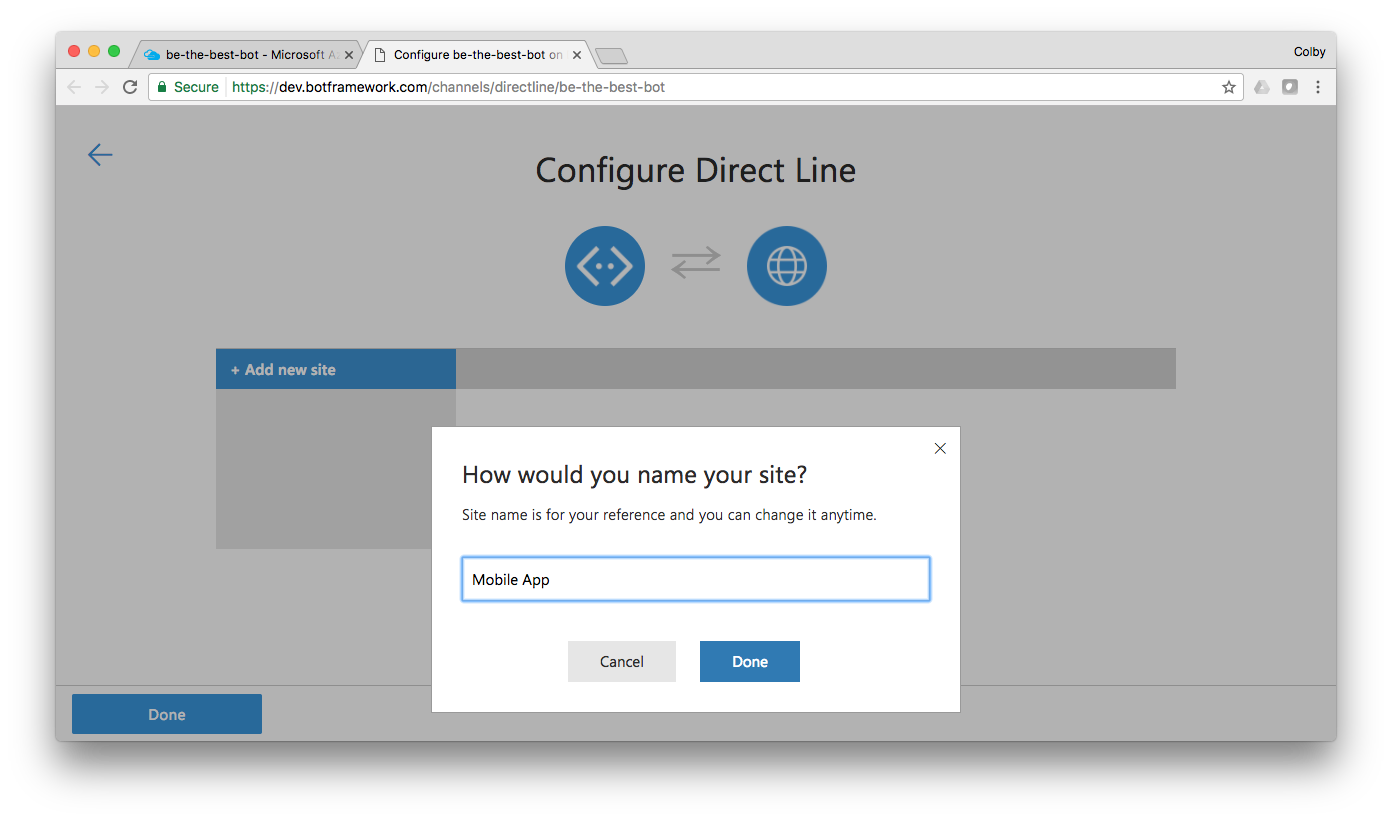
On the <em>Configure Direct Line</em> page, click <strong>+ Add new site</strong> in the left column and enter `Mobile App into the <strong>Name your site</strong> field and click <strong>Done</strong>.<br />
<img src="/images/qa-bot-sample-24.png" alt="screenshot" /><br />
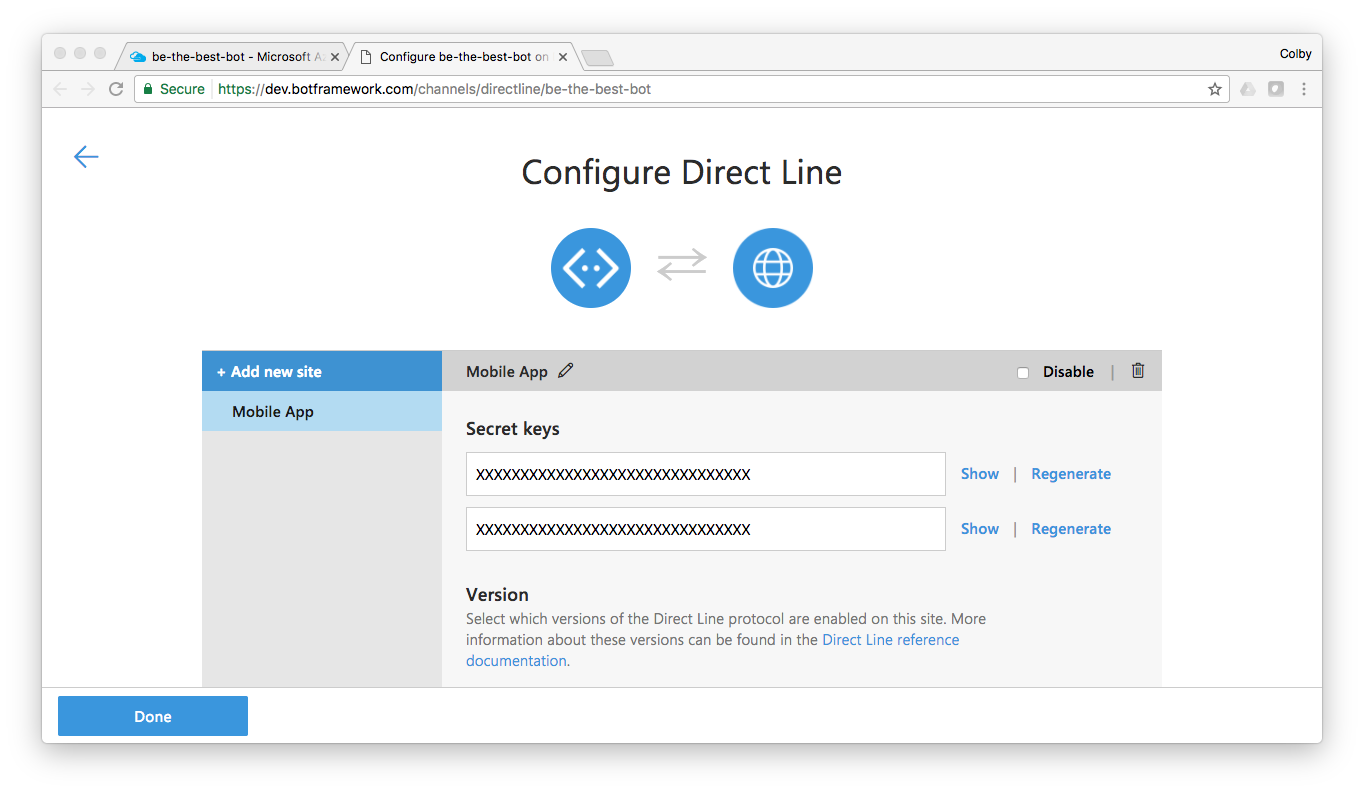
You should now see two <strong>Secret keys</strong>. Click <strong>Show</strong> next to one of the keys, <strong>Copy the key to your clipboard</strong>, then click <strong>Done</strong><br />
<img src="/images/qa-bot-sample-25.png" alt="screenshot" /></p>

<h2 id="add-direct-line-secret-to--mobile-app">Add Direct Line Secret to  Mobile App</h2>

<p>Now that we have the secret, return to Visual Studio for Mac and open (if it’s not already) the app solution we created earlier.</p>

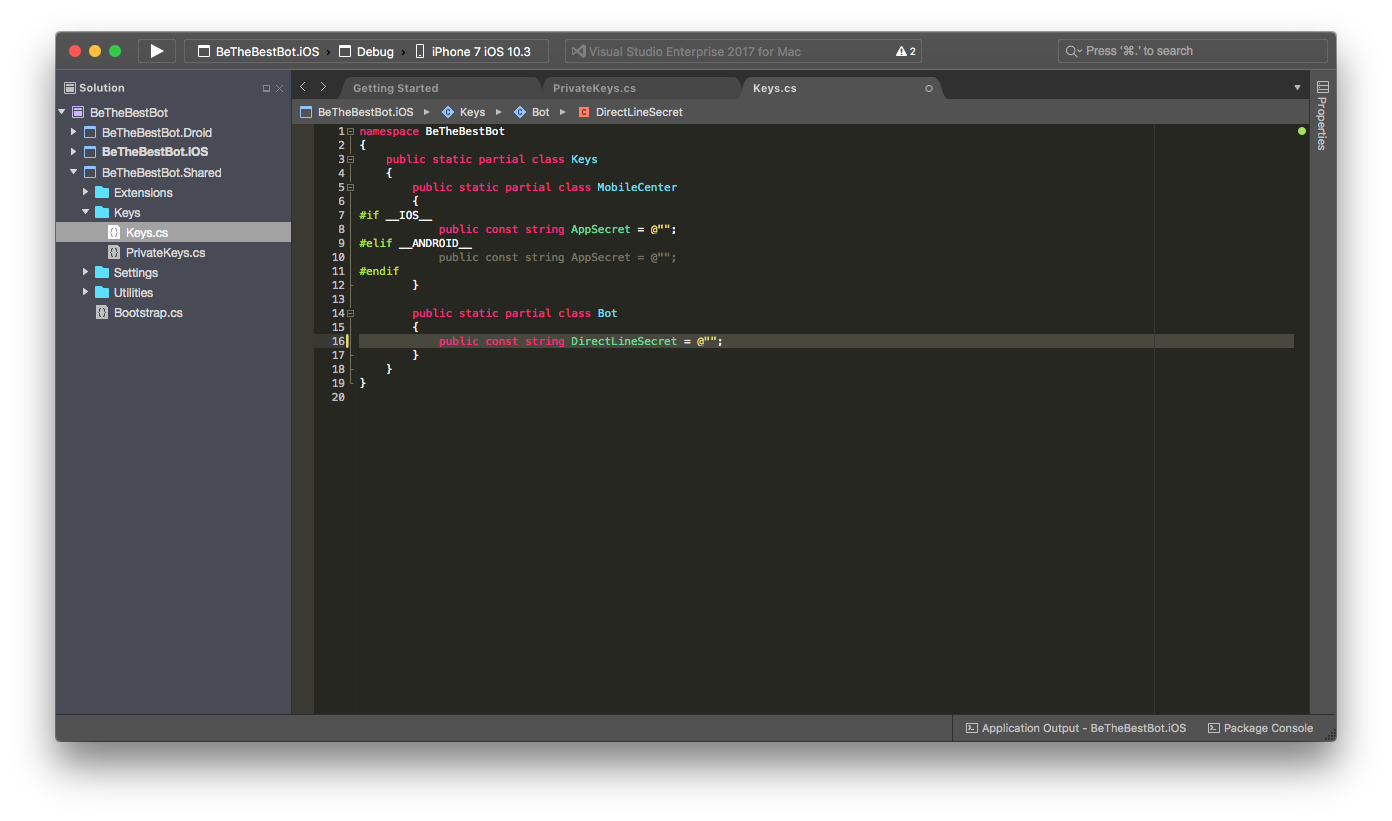
<p>In the Solution Explorer open the <code class="language-plaintext highlighter-rouge">Keys.cs</code> located in the <code class="language-plaintext highlighter-rouge">Keys</code> directory of the Shared project, and paste in the Direct Line secret for the value of <code class="language-plaintext highlighter-rouge">DirectLineSecret</code> on <code class="language-plaintext highlighter-rouge">line 16</code>.
<img src="/images/qa-bot-sample-28.png" alt="screenshot" /></p>

<h2 id="build-and-run-the-app">Build and Run the App</h2>

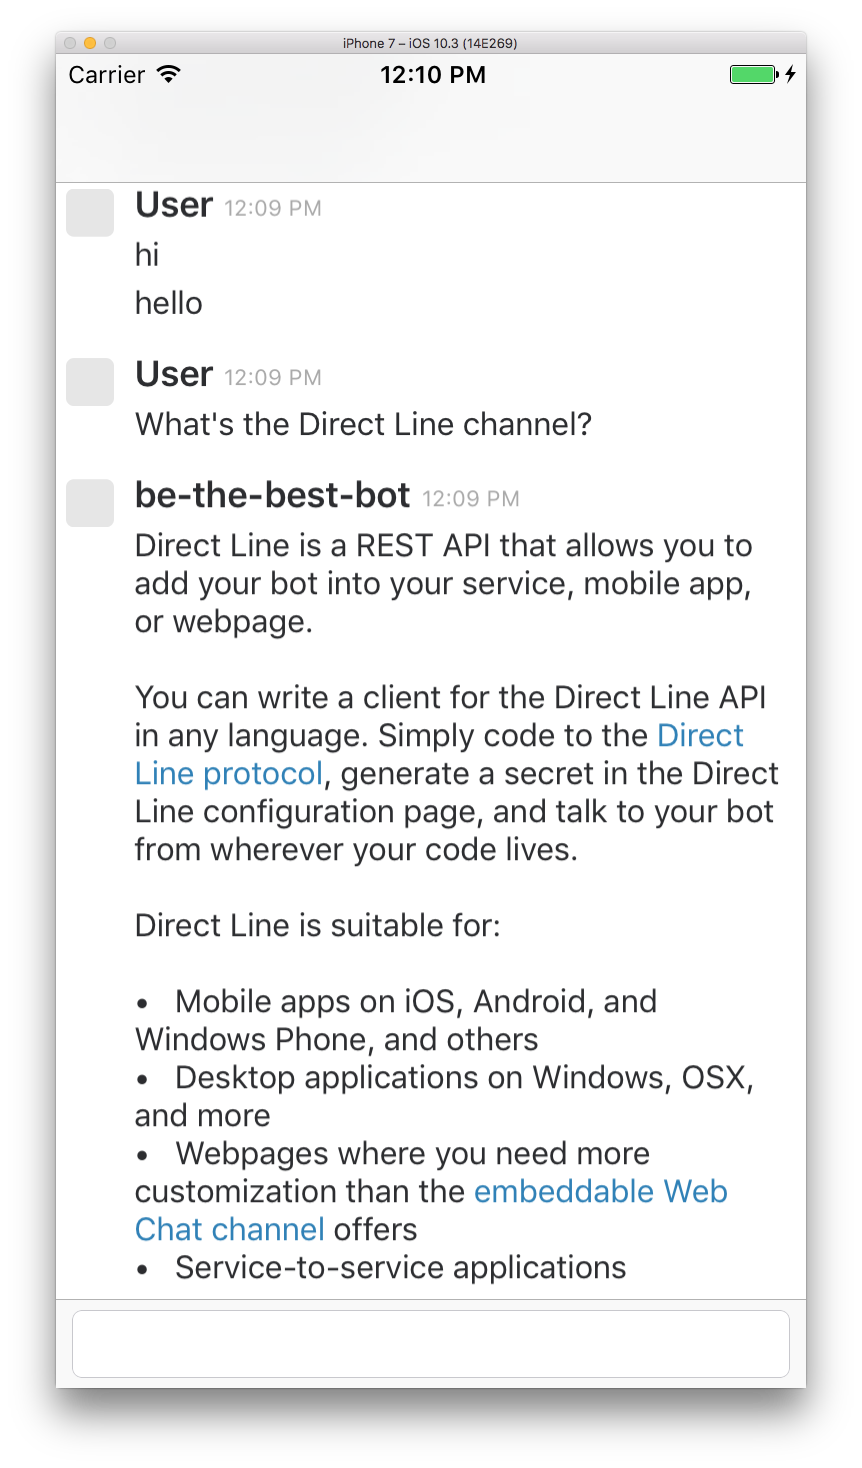
<p>Finally, build and run the app on the iOS Simulator and interact with your bot:</p>
<ul>
  <li>Type <code class="language-plaintext highlighter-rouge">Hi</code> in the chat window and press return</li>
  <li>Type <code class="language-plaintext highlighter-rouge">What's the Direct Line channel?</code> and press return</li>
</ul>

<p><img src="/images/qa-bot-sample-26.png" alt="screenshot" /></p>]]></content><author><name>Colby Williams</name></author><category term="xamarin" /><category term="ios" /><category term="android" /><category term="microsoft" /><category term="bots" /><category term="bot-framework" /><category term="azure" /><category term="azure-functions" /><summary type="html"><![CDATA[This is a quick tutorial where we'll create and publish a new intelligent Bot that uses machine learning and natural language understanding to answer questions about Microsoft Bot Framework. Then we'll create a native iOS and Android app to interact with our bot.]]></summary></entry><entry><title type="html">Type Names as Storyboard IDs</title><link href="https://colbylwilliams.github.io/2016/09/28/type-name-storyboard-id.html" rel="alternate" type="text/html" title="Type Names as Storyboard IDs" /><published>2016-09-28T00:00:00+00:00</published><updated>2016-09-28T00:00:00+00:00</updated><id>https://colbylwilliams.github.io/2016/09/28/type-name-storyboard-id</id><content type="html" xml:base="https://colbylwilliams.github.io/2016/09/28/type-name-storyboard-id.html"><![CDATA[<p>A while back I got in the habit of using the names my of custom types as different identifiers in iOS and macOS storyboards.</p>

<p>This post looks at a couple examples of how this simple practice removes the need for unnecessary strings and leads to cleaner code.</p>

<h2 id="storyboard-identifier">Storyboard Identifier</h2>

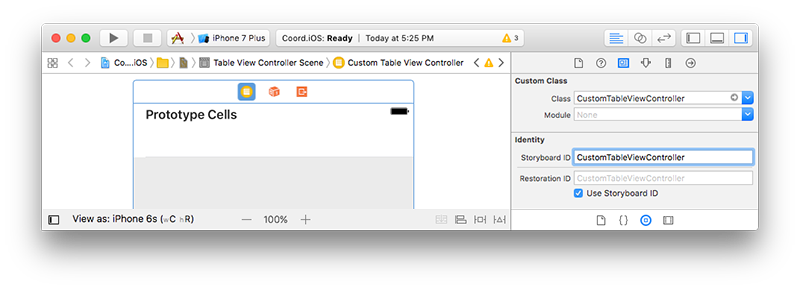
<p>In the first example I’ve added a new <code class="language-plaintext highlighter-rouge">UITableViewController</code> to my storyboard, set the Class to <code class="language-plaintext highlighter-rouge">CustomTableViewController</code> and the Storyboard ID to <em>“CustomTableViewController”</em></p>

<p><img src="/images/type-name-storyboard-id-0.png" alt="Xcode screenshot" /></p>

<p>I can now programmatically create a new instance of <code class="language-plaintext highlighter-rouge">CustomTableViewController</code> using its Storyboard ID:</p>

<figure class="highlight"><pre><code class="language-c#" data-lang="c#"><span class="kt">var</span> <span class="n">storyboardId</span> <span class="p">=</span> <span class="s">"CustomTableViewController"</span><span class="p">;</span>
<span class="kt">var</span> <span class="n">controller</span> <span class="p">=</span> <span class="n">Storyboard</span><span class="p">.</span><span class="nf">InstantiateViewController</span> <span class="p">(</span><span class="n">storyboardId</span><span class="p">)</span> <span class="k">as</span> <span class="n">CustomTableViewController</span><span class="p">;</span></code></pre></figure>

<p>Everything works as expected, as long as I have a view controller in my storyboard with a matching Storyboard ID, and there isn’t a typo in the string.</p>

<p>However, if I <em>know</em> that the Storyboard ID is the same as the type’s name, I can use the <code class="language-plaintext highlighter-rouge">typeof</code> operator and get rid of the string altogether:</p>

<figure class="highlight"><pre><code class="language-c#" data-lang="c#"><span class="kt">var</span> <span class="n">storyboardId</span> <span class="p">=</span> <span class="k">typeof</span><span class="p">(</span><span class="n">CustomTableViewController</span><span class="p">).</span><span class="n">Name</span><span class="p">;</span>
<span class="kt">var</span> <span class="n">controller</span> <span class="p">=</span> <span class="n">Storyboard</span><span class="p">.</span><span class="nf">InstantiateViewController</span> <span class="p">(</span><span class="n">storyboardId</span><span class="p">)</span> <span class="k">as</span> <span class="n">CustomTableViewController</span><span class="p">;</span></code></pre></figure>

<p>Or even better, write an extension method like this:</p>

<figure class="highlight"><pre><code class="language-c#" data-lang="c#"><span class="k">public</span> <span class="k">static</span> <span class="n">T</span> <span class="n">Instantiate</span><span class="p">&lt;</span><span class="n">T</span><span class="p">&gt;</span> <span class="p">(</span><span class="k">this</span> <span class="n">UIStoryboard</span> <span class="n">storyboard</span><span class="p">)</span>
	<span class="k">where</span> <span class="n">T</span> <span class="p">:</span> <span class="n">UIViewController</span>
<span class="p">=&gt;</span> <span class="n">storyboard</span><span class="p">.</span><span class="nf">InstantiateViewController</span> <span class="p">(</span><span class="k">typeof</span> <span class="p">(</span><span class="n">T</span><span class="p">).</span><span class="n">Name</span><span class="p">)</span> <span class="k">as</span> <span class="n">T</span><span class="p">;</span></code></pre></figure>

<p>And cut the code down to:</p>

<figure class="highlight"><pre><code class="language-c#" data-lang="c#"><span class="kt">var</span> <span class="n">controller</span> <span class="p">=</span> <span class="n">Storyboard</span><span class="p">.</span><span class="n">Instantiate</span><span class="p">&lt;</span><span class="n">CustomTableViewController</span><span class="p">&gt;();</span></code></pre></figure>

<p>Now, I not only got rid of the string identifier, but I’ll also get build-time checking that my custom type inherits from <code class="language-plaintext highlighter-rouge">UIViewController</code>.</p>

<h2 id="reuse-identifier">Reuse Identifier</h2>

<p>An even more common example of benefiting from this practice, is in the context of Reuse IDs on <code class="language-plaintext highlighter-rouge">UITableView</code> or <code class="language-plaintext highlighter-rouge">UICollectionView</code> cells.  Take the <code class="language-plaintext highlighter-rouge">UITableViewCell</code> subclass below.</p>

<figure class="highlight"><pre><code class="language-c#" data-lang="c#"><span class="k">public</span> <span class="k">class</span> <span class="nc">CustomTableViewCell</span> <span class="p">:</span> <span class="n">UITableViewCell</span>
<span class="p">{</span>
	<span class="k">public</span> <span class="k">void</span> <span class="nf">SetData</span><span class="p">(</span><span class="n">Item</span> <span class="n">item</span><span class="p">)</span> <span class="p">=&gt;</span> <span class="n">titleLabel</span><span class="p">.</span><span class="n">Text</span> <span class="p">=</span> <span class="n">item</span><span class="p">?.</span><span class="n">Name</span><span class="p">;</span>
<span class="p">}</span></code></pre></figure>

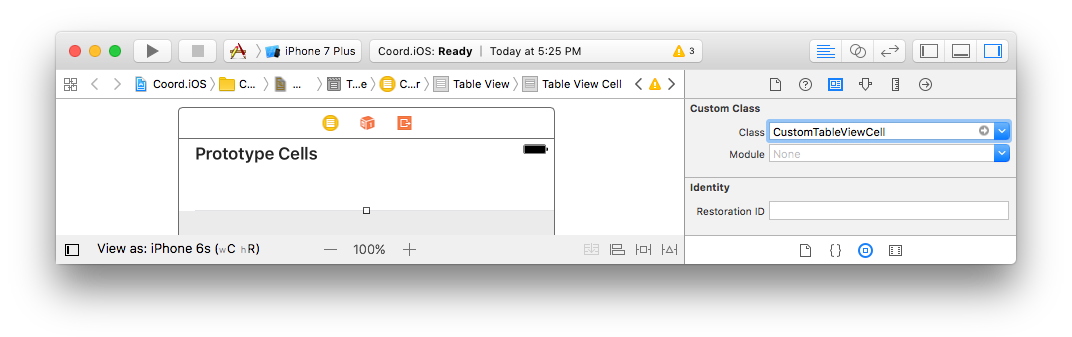
<p>In my storyboard, I’ve set the <code class="language-plaintext highlighter-rouge">CustomTableViewController</code>’s prototype cell’s Class to <code class="language-plaintext highlighter-rouge">CustomTableViewCell</code>:</p>

<p><img src="/images/type-name-storyboard-id-1.png" alt="Xcode screenshot" /></p>

<p>Then set the cell’s Reuse ID to <em>“CustomTableViewCell”</em></p>

<p><img src="/images/type-name-storyboard-id-2.png" alt="Xcode screenshot" /></p>

<p>Normally, my <code class="language-plaintext highlighter-rouge">CustomTableViewController</code> (or <code class="language-plaintext highlighter-rouge">UITableViewDataSource</code>) <code class="language-plaintext highlighter-rouge">GetCell</code> override would look something like this:</p>

<figure class="highlight"><pre><code class="language-c#" data-lang="c#"><span class="k">public</span> <span class="k">override</span> <span class="n">UITableViewCell</span> <span class="nf">GetCell</span> <span class="p">(</span><span class="n">UITableView</span> <span class="n">tableView</span><span class="p">,</span> <span class="n">NSIndexPath</span> <span class="n">indexPath</span><span class="p">)</span>
<span class="p">{</span>
	<span class="kt">var</span> <span class="n">reuseId</span> <span class="p">=</span> <span class="s">"CustomTableViewCell"</span><span class="p">;</span>

	<span class="kt">var</span> <span class="n">cell</span> <span class="p">=</span> <span class="n">tableView</span><span class="p">.</span><span class="nf">DequeueReusableCell</span> <span class="p">(</span><span class="n">reuseId</span><span class="p">,</span> <span class="n">indexPath</span><span class="p">)</span> <span class="k">as</span> <span class="n">CustomTableViewCell</span><span class="p">;</span>

	<span class="n">cell</span><span class="p">?.</span><span class="nf">SetData</span> <span class="p">(</span><span class="n">Items</span> <span class="p">[</span><span class="n">indexPath</span><span class="p">.</span><span class="n">Row</span><span class="p">]);</span>

	<span class="k">return</span> <span class="n">cell</span><span class="p">;</span>
<span class="p">}</span></code></pre></figure>

<p>However again, if I <em>know</em> that the Reuse ID is the same as the cell type’s name, I can get rid of the string, and write another extension method:</p>

<figure class="highlight"><pre><code class="language-c#" data-lang="c#"><span class="k">public</span> <span class="k">static</span> <span class="n">T</span> <span class="n">Dequeue</span><span class="p">&lt;</span><span class="n">T</span><span class="p">&gt;</span> <span class="p">(</span><span class="k">this</span> <span class="n">UITableView</span> <span class="n">tableView</span><span class="p">,</span> <span class="n">NSIndexPath</span> <span class="n">indexPath</span><span class="p">)</span>
	<span class="k">where</span> <span class="n">T</span> <span class="p">:</span> <span class="n">UITableViewCell</span>
<span class="p">=&gt;</span> <span class="n">tableView</span><span class="p">.</span><span class="nf">DequeueReusableCell</span> <span class="p">(</span><span class="k">typeof</span> <span class="p">(</span><span class="n">T</span><span class="p">).</span><span class="n">Name</span><span class="p">,</span> <span class="n">indexPath</span><span class="p">)</span> <span class="k">as</span> <span class="n">T</span><span class="p">;</span></code></pre></figure>

<p>And cut my <code class="language-plaintext highlighter-rouge">GetCell</code> override to the code below, with the build-time checks:</p>

<figure class="highlight"><pre><code class="language-c#" data-lang="c#"><span class="k">public</span> <span class="k">override</span> <span class="n">UITableViewCell</span> <span class="nf">GetCell</span> <span class="p">(</span><span class="n">UITableView</span> <span class="n">tableView</span><span class="p">,</span> <span class="n">NSIndexPath</span> <span class="n">indexPath</span><span class="p">)</span>
<span class="p">{</span>
	<span class="kt">var</span> <span class="n">cell</span> <span class="p">=</span> <span class="n">tableView</span><span class="p">.</span><span class="n">Dequeue</span><span class="p">&lt;</span><span class="n">CustomTableViewCell</span><span class="p">&gt;(</span><span class="n">indexPath</span><span class="p">);</span>

	<span class="n">cell</span><span class="p">?.</span><span class="nf">SetData</span> <span class="p">(</span><span class="n">Items</span> <span class="p">[</span><span class="n">indexPath</span><span class="p">.</span><span class="n">Row</span><span class="p">]);</span>

	<span class="k">return</span> <span class="n">cell</span><span class="p">;</span>
<span class="p">}</span></code></pre></figure>

<h2 id="dig-it">Dig it?</h2>

<p>You can find a the extension methods mention above and several more including support for collection views, <a href="https://github.com/colbylwilliams/NomadCode/blob/master/NomadCode/NomadCode.iOS/Extensions/StoryboardExtensions.cs">here</a>.</p>]]></content><author><name>Colby Williams</name></author><category term="xamarin" /><category term="ios" /><category term="tips" /><category term="storyboard" /><category term="xcode" /><category term="C#" /><summary type="html"><![CDATA[A while back I got in the habit of using the names my of custom types as different identifiers in iOS and macOS storyboards. This post looks at a couple examples of how this simple practice removes the need for unnecessary strings and leads to cleaner code.]]></summary></entry><entry><title type="html">Xamarin vs. Native</title><link href="https://colbylwilliams.github.io/2016/09/27/xamarin-vs-native.html" rel="alternate" type="text/html" title="Xamarin vs. Native" /><published>2016-09-27T00:00:00+00:00</published><updated>2016-09-27T00:00:00+00:00</updated><id>https://colbylwilliams.github.io/2016/09/27/xamarin-vs-native</id><content type="html" xml:base="https://colbylwilliams.github.io/2016/09/27/xamarin-vs-native.html"><![CDATA[<p>I spend a lot of my time talking to people about mobile development.  Many of these conversations are about Xamarin, and how it compares to “native”, so I figured I’d take the time to break down Xamarin.  I’ll also spend a little time on alternative approaches to mobile development — just to add some context.  Here’s the short version:</p>

<p><em><strong>Mobile applications written in C# using Xamarin are native — just as native as iOS apps written in Swift or Objective-C, and Android apps written in Java.</strong></em></p>

<p>If you’re intrigued (or disagree), read on.  If you did read on, and you still disagree, email me.  We’ll get to the bottom of this ;)</p>

<h2 id="approaches-to-writing-mobile-apps">Approaches to Writing Mobile Apps</h2>

<p>Okay, let’s break it down.  When you, your company, your wife - whatever, decide to build a mobile app, you’ve got a few options.  And like most things in life, each choice, or approach, is going to have pros and cons.</p>

<p>Since we’re comparing Xamarin to “native”, let’s start out with the approach that undoubtedly yields a 100% native app.  I tend to call this approach Indigenous Native, or simply writing the native app with the “indigenous” language and toolset.  An example of this approach would be writing an iOS app in Swift using Xcode.</p>

<h3 id="indigenous-native">Indigenous Native</h3>

<p>This approach is going to yield a fully native app that performs and responds the way the user expects it to.  Perfect.</p>

<p>However, the approach is also going to yield a unique codebase for each platform the app will support.  If the app is written for iOS and Android, the iOS version must be written in Swift or Objective-C using Xcode, then the Android version must be written from scratch in Java using Android Studio or Eclipse, leaving you with two separate codebases, and likely two separate teams writing and maintaining them.</p>

<p>Kind of sounds terrible.  But a truly native application is so important to a mobile app’s success — both consumer apps and business apps — that people and companies commonly write and maintain two completely separate codebases for the same app on iOS and Android.</p>

<p>That’s why the “short version” simply states that Xamarin is native.  That’s the most important part.</p>

<h3 id="xamarin">Xamarin</h3>

<p>Xamarin is the only other approach to building mobile apps that yields a fully native app and does so without limiting the developer to a subset of the native SDKs.  To understand how that’s possible, let’s break down what Xamarin is and a little bit of how it works.</p>

<p>Xamarin is essentially made up of two parts — the first of which is a collection of one-to-one bindings for the entire iOS, Mac, and Android SDKs.  What does that mean?</p>

<h4 id="one-to-one-bindings">One-to-One Bindings</h4>

<p>Well Xamarin didn’t reverse-engineer all the frameworks and libraries you’d use to write native iOS and Android apps.  Instead, they simply <em>exposed</em> those APIs to C#.  When you call an iOS or Android API in your Xamarin app in C#, you’re calling the exact same API of the exact same framework or library you would call using the “indigenous” languages.</p>

<p>So with just this “first part” of Xamarin, you now have access to everything you would if you were writing your app in Objective-C, Swift, or Java.  <em><strong>Anything that can be done in an iOS application using Objective-C or Swift, and anything that can be done in an Android app using Java, can be done in C# using Xamarin.</strong></em>  There is no exception.</p>

<p>These one-to-one bindings cover 100% of the public APIs Apple and Google have exposed to developers to write iOS and Android apps respectively.</p>

<p>To put this in context, you could literally take an iOS app written in Swift, or a Android app written in Java, and rewrite it line-for-line — using all of the same objects, methods, properties, etc. — in C# with Xamarin and end up with the same app with the same UI, the same performance, the same… well, you get it.</p>

<p>Those of you that’ve been paying attention may have just realized that Xamarin doesn’t sound all that cross-platform at all.  If you’re just calling the same APIs in a different language, you’re not going to share any code…?</p>

<p>You’re right.  The way I see it, Xamarin is not really a “cross-platform solution”, but there is a cross-platform “component” to Xamarin — and that’s the second part — Mono.</p>

<h4 id="mono">Mono</h4>

<p>Mono is an implementation of the .NET base class libraries that’ll run natively inside of your Xamarin app.</p>

<p>There’s plenty of information out there on Mono — if you want to find out more, I’d encourage you to Google it — but in the context of Xamarin, Mono means you can write portable .NET code in C# (or F#) and share it across your native iOS, Mac, Android, Windows apps.</p>

<p>Anything you can do using the .NET base class libraries — or with any third-party portable .NET library — you write once and share that code and functionality across a iOS, Mac, Android, and Windows.  A couple of common examples of this are the service layer and data access layers of your application.</p>

<p>The title of this post is Xamarin vs. Native, so I’m not going to spend as much time on the remaining approaches.</p>

<p>I’m going to lump everything else into two remaining buckets: Hybrid and Web.  There are several solutions out there that create a pretty big spectrum, but I’ll be talking about these two categories at such a high level, it won’t really matter.</p>

<h3 id="hybrid">Hybrid</h3>

<p>First let’s talk Hybrid.  Usually these solutions are truly “write-once-run-everywhere” and frequently written in a familiar language like JavaScript.</p>

<p>The two biggest benefits to using a hybrid solution are 1) the time it takes to produce a functional app and 2) the ability to use existing skills (JavaScript).</p>

<p>Additionally, some Hybrid solutions can compile to a native or near-native app.  And depending where on the spectrum the solution sits, this is going to mean much better performance than a webpage disguised as an app (see below).</p>

<p>But I want to clarify what I mean when I say “compile to a native or near-native app” because the word “native” gets thrown around a lot.</p>

<p>“Native binary” does not necessarily mean a “native app” in the same sense as the two previous approaches.  If a Hybrid tool exposes 60% of the iOS and Android SDK through its own “write-once-run-everywhere” APIs, it may compile the resulting app to native binary, but the app is still going to look and feel like it was developed using 60% of the SDK.</p>

<p>To put this in context, let’s look at the very specific example: the best way to do animations inside of an iOS application is to use the animation framework that Apple created and distributed to developers to do animations in iOS apps.  Using anything else is either going to yield subpar animations, perform poorly, or simply be an abstraction that is actually using the same animation framework behind the scenes.</p>

<p>Without access to 100% of the APIs in 100% of the frameworks shipped with the iOS SDK, you are going to be limited.  Now, that example was specific to iOS, but the concept is equally true for Android.</p>

<p>Every Hybrid solution is going to have some level of this “least common denominator” type limitation. The only two approaches that expose 100% of the SDKs are Indigenous Native and Xamarin.</p>

<h3 id="web">Web</h3>

<p>In the context of the blog post, Web refers to everything from responsive or mobile websites, to apps made of wrapped websites.</p>

<p>And on this approach, I’ll very be brief.  There is absolutely a place for responsive or mobile web, but let’s not call it a mobile app.  Why?  Well, let’s be honest, just because the app can open up the camera, it’s still just a webpage.</p>

<h2 id="the-end">The End</h2>

<p>Hopefully this short write-up puts Xamarin in perspective for those interested.</p>

<p>I’m obviously a fan of Xamarin, and that’s really because I love native iOS and Android development, and I really like C#.</p>]]></content><author><name>Colby Williams</name></author><category term="xamarin" /><category term="ios" /><category term="android" /><summary type="html"><![CDATA[I spend a lot of my time talking to people about mobile development. Many of these conversations are about Xamarin, and how it compares to "native", so I figured I’d take the time to break down Xamarin. I’ll also spend a little time on alternative approaches to mobile development — just to add some context.]]></summary></entry><entry><title type="html">Default Designer</title><link href="https://colbylwilliams.github.io/2016/09/26/default-designer.html" rel="alternate" type="text/html" title="Default Designer" /><published>2016-09-26T00:00:00+00:00</published><updated>2016-09-26T00:00:00+00:00</updated><id>https://colbylwilliams.github.io/2016/09/26/default-designer</id><content type="html" xml:base="https://colbylwilliams.github.io/2016/09/26/default-designer.html"><![CDATA[<p>I’ve been developing native iOS, macOS and Android with Xamarin for years now.  I love C# and Xamarin Studio is an incredible IDE.</p>

<p>However, I prefer to work with <code class="language-plaintext highlighter-rouge">.xibs</code> and <code class="language-plaintext highlighter-rouge">.storyboards</code> in Xcode Interface Builder opposed to Xamarin Studio’s built-in designer.</p>

<p>Within Xamarin Studio you can open these files in Xcode easily using the “Open with…” action menu, but I wanted it to use Xcode by default.</p>

<p>Yesterday I wrote a <a href="https://github.com/colbylwilliams/DefaultDesigner">simple add-in</a> for Xamarin Studio that sets Xcode Interface Builder as the default designer for <code class="language-plaintext highlighter-rouge">.xib</code> and <code class="language-plaintext highlighter-rouge">.storyboard</code> files.</p>

<p>You can check out the <a href="https://github.com/colbylwilliams/DefaultDesigner">source</a> or just follow these steps to install the add-in and use in Xamarin Studio:</p>

<ol>
  <li>Download the <code class="language-plaintext highlighter-rouge">.mpack</code> file of the <a href="https://github.com/colbylwilliams/DefaultDesigner/releases/latest">latest release</a></li>
  <li>Launch Xamarin Studio, open the <strong>Xamarin Studio</strong> menu and select <strong>Add-ins…</strong></li>
  <li>In the bottom left of the <em>Add-in Manager</em> dialog, click <strong>Install from file…</strong></li>
  <li>Choose the <code class="language-plaintext highlighter-rouge">.mpack</code> file you downloaded in step 1.</li>
  <li>When prompted, select <strong>Install</strong></li>
</ol>

<p>With the add-in installed, double-clicking <code class="language-plaintext highlighter-rouge">.xib</code> and <code class="language-plaintext highlighter-rouge">.storyboard</code> files will open them in Xcode Interface Builder.  Xamarin Studio’s designer can still be used via the “Open with…” action menu.</p>]]></content><author><name>Colby Williams</name></author><category term="xamarin" /><category term="xamarin-studio" /><summary type="html"><![CDATA[I prefer to work with .xibs and .storyboards in Xcode Interface Builder opposed to Xamarin Studio’s built-in designer. Default Designer is a Xamarin Studio add-in to open these files with Xcode Interface Builder by default.]]></summary></entry></feed>